Showing posts with label home school art. Show all posts

Monday, August 10, 2015

The Apprentice Art Studio is Finished!


ANNOUNCEMENTS
  • Studio Open House: Tuesday, Aug. 18th 2-5pm Download Invite HERE
  •  Fall Class List, Download your copy HERE 
  • Classes will begin in Sept. 22nd and space is limited. I can't wait to get messy!

I can hardly stand it!  Thanks for being so patient! I finished up the last of the studio this weekend- so exciting! Finally you can see what I  have been going on about! Now, all I need are stools, which I promise will be here by the time classes starts. I still have a couple things to finish off the room for the open house next week, but they will be a surprise.
To the right is my personal working area
My Palette Plate, thick with paint

View from my working space to class space nice and cozy!

There are lots of interesting things to find inspiration from
I hope you can stop in and say hi!

Monday, December 1, 2014

Attention All Art Classes

Mrs. Wombacher with Vertigo

Hi Art Students, 
I am coming to you from my easy chair at home- crazy right!?? Well, I have had better days and I am sorry that I was unable to be with you all for our art lessons. But with technology I can come to you virtually, isn't that great!!! So pay attention because you all have something to do this week, to keep us all on track. This way, we won't miss a single thing! Hoooooray!

GeoArt and Maps: 


Okay kids get a globe or map and find the continent of Europe, now find Great Britain or the United Kingdom or England. Now look at the country south of Britain across the English Channel. Do you see it? 
Now printout this document and build it with your mom or dad. All you need are scissors and glue or tape. Do you know what this building is called? Can you be ready to tell me 2 facts about this country?  I am sure you will know which one it is. Also practice our country chant and motions in front of your mom too. You can bring your project week #6 so we can put a flag on top!

 HIS Medieval Art Class:
  • Download the worksheets from the HIS website on decorative elements. These are labeled boarder worksheets 1-4 under Art materials.
  • Look over and follow step-by- step, adding the next thing as you go. 
  • Please only use period colors-no bright pinks or neon orange etc. Stick to deep muted colors.
  • You may use colored pencils, crayons, or your watercolor crayons.
  •  Please decorate the title pages (the page the sticky tab is on or the page before your project, in your book of hours) for each section we have learned Roman and Uncial(Celtic) using the decorative boarder elements you have practiced from the worksheets.
  • You may use any combination of elements learned from the lesson worksheets. 
  • My hope is that you complete a border on one page and maybe corners or corner boxes connected a with decorative border on the second title page.
  •  When writing the title for the 2 sections we have learned, please use that hand or style of calligraphy lettering.  
  • Use your calligraphy pen, mark your guidelines with pencil. Get out your stroke instructions if you need a reminder!
  • Make sure to leave spaces and portions of elements uncolored so that we can illuminate them on the last week before break with gold paint!
  • If you are unsure how to do it in your book then do it on another piece of paper and we can cut it out and paste it in week #6. 
  • Come to class ready with a boarder to illuminate with gold.  We may even have a special guest hhhmmmm! So be prepared!
Immanuel Art Class:

We will be doing the same thing as above during class time, but Mrs. Essman may be there teaching you instead of me, if I am not better by then.  She will have all the worksheets for you.

Any questions I am an email away! Thanks for your patients I hope to be better soon! 
Mrs. Wombacher

Tuesday, October 29, 2013

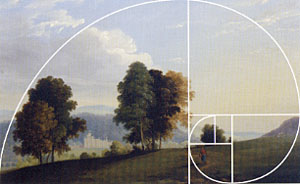
Drawing Faces and the Golden Section

Our next assignment is learning how to draw faces. Yes, yours! Aren't you excited? As I learned to draw faces, I started to look at faces differently. I now look at the relationship between the parts of the face. How far apart are eyes? How about the way shadows are cast on cheekbones and chins. What gives a face character? Dimples? Pimples? Wrinkles? Scars? This week spend some time studying the faces in your life. Look at symmetry, how big is the forehead in relation to the other parts of the face. What gives your face character and is uniquely you? How can you portray that in a drawing? Where do the dark values vs. light values naturally occur on your face?

This week look at pictures of yourself and choose a picture that is a close up of your face or one that you can enlarge. It must have detail! You should be able to see all your features well. Another option if you are pressed for time or can't find a good photo with detail,  find a picture in a magazine where the whole page is taken up by the face- beauty magazines have good pictures to use. Bring these into class next 
co-op day please!

As you study and observe, you will start to see the proportions that naturally occur on your face. When looking at the ratios or spaces between the forehead and eyes, nose and mouth do you see anything interesting?  You should, because these proportions and patterns are found all over the place in nature and were created in the ancient world. This patterning was discovered long ago, in the 6th century BC, by mathematicians. It was used by the Egyptians to build the pyramids. Artists like Leonardo da Vinci, used it when he painted the Mona Lisa., as well as, musicians  and scientists  have used it throughout the ages. It is called the Golden Section or Golden Mean. Believe it or not we are still using this in design today, take a look at the iPod or iPhone both were designed with the Golden Section theory. Sweet!

To watch a video on this, visit this website HERE (WARNING there is a nude, The Vitruvian Man, famous drawing, created by Leonardo da Vinci circa 1490.) This short You tube is fascinating and gives us perspective and insight  into our created world. HERE is a website with Golden Section applied to the human face. SO cool! HERE is a tutorial on the female face to draw step-by-step. If you click on the image it will get bigger so you can print or look at it. Have fun this week!

NEW UPDATE: You can get the practice worksheets for class HERE and HERE (3 pages total) if you wish to practice(which I hope you do in preparation for this week!)

Saturday, June 8, 2013

2013 A Great ART Year!


Student Artwork HIS Co-op End of the Year Program

This year was wonderful for me as a teacher! I added another art class to my schedule and was so pleased with all the students progress. I taught at two different co-ops, HIS Ministry Co-op and Immanuel Co-op, different style co-ops but both classes engaged great homeschooling students.

This year we studied the world of Modern Art. I have to say, that as a teacher, I was pleasantly surprised by how much my students enjoyed this era of art. What I enjoyed most was being able to present living artists to my students, even one from our area who grew up in my hometown. Students had the opportunity to attend a couple of free exhibits at our local art museum, Andy Warhol and Eric Carle too. I love being able to offer students this opportunity. Experiencing art up close and personal is so different then seeing it on a page in a book.

Students also had the opportunity to enter their artwork into our local Spring Fair and be judged against their peers.  This too, is part of an artists life. I enjoy encouraging my students to take the opportunity to engage other people in what they are doing and to have the courage to take that risk. I never tire of seeing a students confidence increased!

I also enjoyed taking techniques, that I learned in my continuing education over the summer, and teaching them to my students. This year students learned a saturated paper watercolor technique and stenciling technique I learned at a Kay Barnes workshop. Students had fun creating their own stencil to use in their creation of a Marc Chagall  painting.

Below are photos from the End of the Year program at HIS Co-op. Students at HIS Co-op had a great time working collaboratively like, Dale Chihuly, to make a mural. This is our version of  his Mille Flori.  In this project students studied pattern and shape and looked at contrast of colors. Fabulous!

Thanks for a wonderful year and making the world a beautiful place with what you have created, Mrs. W


HIS Mille Flori a Tribute to Dale Chihuly


Student works. Some of the Artists studied: Mondrian, Rene Magritte, Marc Chagall, Jasper Johns, and  Seurat 

Monday, April 29, 2013

Art and Faith

Makoto Fujimura
This is our last Artist model for this year, but it is the one I am most excited about sharing with all my Apprentice with the Masters Art Class students!

Makoto Fujimura,  is an artist that really inspires me. I have never been a big fan of abstract art but his artwork is gentle and resonates with such tradition and beauty that I can't help but look at it. It speaks to my heart. He is a modern abstract or non-representational artist with the heart that follows Christ.  Watch this video to learn about how he is bringing together believers and non-believers with this art. My prayer is that you will do the same thing with your own artwork! You can find out more about him at Artsy HERE

One of the letter tiles used in the Four Gospels

Inside the Four Gospels -The Book of John

Charis-Kairos   The Tears of Christ

Please watch this video of Makoto's latest work, entitled Golden Sea. My heart was captivated by his story and this painting's beauty!


Monday, April 22, 2013

Tacoma, Glass, Chihuly...Oh MY!

Dale Chihuly is our next Artist and model for Apprentice with the Masters Art Class.  How exciting to study and learn about a living artist from our own area! Dale Chihuly is an international glass sculptor who has traveled the world and exhibited in many incredible environments.  If you have ever seen an exhibit you know what I mean when I say his artwork takes your imagination to new places! We do not have the budget or the tools to blow glass, but we are going to use the same creative process he does when he is thinking through his work. You and your family can always visit The Museum of Glass in Tacoma to see his work or the Tacoma Art Museum has a gallery of his work as well. But if you can't get there, then you can take a virtual visit here and see the hot shop in action at the Tacoma Glass Museum. Here is an  online look at what is going on in the hot shop today!

We will  watch a video in class so no information video links on this post but I do want you to think through the questions below and come to class ready to share your answers. I think you will be fascinated by the beauty of his art  and his ingenious!

Here is a look at just a few of his pieces to inspire your own imagination.


Two things to think about :
1. How does he blow so many pieces of glass to make his sculptures?
2. What does his glass sculptures remind you of?
3. Do you see any elements of art in his work? Which ones?(hint: look at your new vocabulary words)


Sunday, February 24, 2013

Looking at the Flag


Flag, 1954-55


Jasper Johns

Art students what is so special about this flag? Is it that it represents our country? It is a symbol of freedom and democracy?  Please look at these 2 You tube videos #1 HERE and #2 HERE to learn about our next Modern Art model Jasper Johns. He is considered a Pop artist. What makes him a pop artist? What medium does he use to paint with? Come to class and be able to talk about why he paints flags.


                               Colored Alphabet                                                                                              Figure 8 

Tuesday, January 22, 2013

Seeing Eye to Eye

The False Mirror, 1928, Oil


The Return 1940, Oil
Our next model for art class is Rene Margritte. Another Surrealist and very imaginative painter. Please visit this Youtube video for an informative short video all about him for class.(the music may be distracting, it was for me for some reason, so just mute) I think you will really like it. He is very good at using positive and negative space which is our next element of art to explore in class.

Wednesday, December 26, 2012

Chagall

Couple and Fish

Our next model is an interesting fellow and one I like very much. The more I learn about his life the more I like his artwork. His name is Marc Chagall. Here are a couple of informative You Tube Videos to give you some additional information about his life.


Marc Chagall

Can you tell me some of the different medium that he worked in? Can you tell me about his religious beliefs from his artwork? What kinds of symbols do you see that would tell you about who he is and where he comes from? You may have to look closely but I bet you will be able to tell.
Video 1
Video 2

Look at how large these paintings are-just beautiful!


Autumn in the Village


Tree of Life 1948

The Blue Circus

Tuesday, November 27, 2012

Check this Out! A New Twist to Pointillism!


Artist Mary Ellen Croteau- Self-Portrait

I am so inspired by this artist. Taking the mundane and doing something extraordinary-will wonders never cease!  Guess what she used? Can't ? Visti her website and see some more extraordinary photos of this new twist on modern Pointillism. I love this!

Sunday, October 28, 2012

Seurat- Color and Pointillism

Eiffel Tower 1889
As we move into our next Art Element of study Color, I am excited for my students to study and interesting artist Seurat. He developed a painting technique called Pointillism. Using dots of colors to fool the eye into thinking it is a mixture of another color. It still exists today in how comics are colored, and anything that has  pixelated color, computers, cell phones, etc. these things build on this artistic way of mixing color.
Georges Seurat
For example: dots of blue and red together trick the eye into thinking it is purple if you are far away from it.  Here is what I mean, look at the picture below I took at the Metropolitan Museum of Art in New York. This is Sunday Afternoon on the Island of La Grande Jatte, the bottom picture is a close up of the lower right hand corner of the painting.


Sunday Afternoon on the Island of La Grande Jatte

detail of Sunday Afternoon on the Island of La Grande Jatte
As you can see from far away your eye is tricked into thinking it is another color when really it is several hues used to make one. Interesting, don't you think?
Please link to the following YouTube to see a 3 min. video all about Seurat and his artwork.  Then go to this video to see a time laps self-portrait done in pointillism- this is super cool!

Monday, October 1, 2012

Edvard Munch


Munch is famous for his painting The Scream. But he was also a great expressionistic painter and painted many other moving paintings. I wanted students to be able to see an artist's work as a whole. Munch created so many works depicting the deep emotional places of life, many of them filled with extremes, such as great love and great loss. This is a great view of the culmination of his life’s work, call The Frieze of Life.

At the website below students will still get a great understanding for this artist, even if they view just a few slides in each section. (warning there is nudity: slides #7, 11, 13, 18, 22) The  wonderful thing about this site is that the notes for each painting are a primary source! Munch’s own words, from his own diaries. I hope you will take time to visit and explore the world according to Munch.


This is our artist model as we study the element of light. So much of Munch's work is from a deep place of emotion,  I chose this painting because it offered a bright look at life and the environment around him at the time he painted this picture. Students will be using oil pastels and watercolor washes to paint this picture.

Study of Light, Value and Shading

 Watch the following fun videos on shading. I hope they will inspire you to get out your art box and practice what we have been learning in class! Try different techniques and different mediums. Pens and cross-hatching, Charcoal and smooth blending with your smudge nubs, Sketch pencil and lines. Get creative! What did you like best? What did you find difficult?

Shading shapes into forms- this is awesome!  I hope it will inspire you to practice your shading! This complements what we learned about in class today.                       http://youtu.be/ExRRHY9wT6Q


This is a fun video to watch on how to draw a pumpkin and shade it . Can you see the value scale on the pumpkin?Which direction is the light coming from?

                              Shading a pumpkin http://youtu.be/xJnMK-kSbEo