Showing posts with label drawing. Show all posts

Thursday, August 13, 2015

Online Registrations- Life Just Got a Little Easier!


Hello Future Art Apprentices! 
I have just made life a wee bit easier for you. Voila! You may now register online via this awesome google form. Click the link HERE fill out the form, click the submit button...and done! Now you can check that off your back to school to do list YEAH!

Tuesday, October 29, 2013

Drawing Faces and the Golden Section

Our next assignment is learning how to draw faces. Yes, yours! Aren't you excited? As I learned to draw faces, I started to look at faces differently. I now look at the relationship between the parts of the face. How far apart are eyes? How about the way shadows are cast on cheekbones and chins. What gives a face character? Dimples? Pimples? Wrinkles? Scars? This week spend some time studying the faces in your life. Look at symmetry, how big is the forehead in relation to the other parts of the face. What gives your face character and is uniquely you? How can you portray that in a drawing? Where do the dark values vs. light values naturally occur on your face?

This week look at pictures of yourself and choose a picture that is a close up of your face or one that you can enlarge. It must have detail! You should be able to see all your features well. Another option if you are pressed for time or can't find a good photo with detail,  find a picture in a magazine where the whole page is taken up by the face- beauty magazines have good pictures to use. Bring these into class next 
co-op day please!

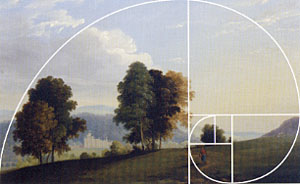
As you study and observe, you will start to see the proportions that naturally occur on your face. When looking at the ratios or spaces between the forehead and eyes, nose and mouth do you see anything interesting?  You should, because these proportions and patterns are found all over the place in nature and were created in the ancient world. This patterning was discovered long ago, in the 6th century BC, by mathematicians. It was used by the Egyptians to build the pyramids. Artists like Leonardo da Vinci, used it when he painted the Mona Lisa., as well as, musicians  and scientists  have used it throughout the ages. It is called the Golden Section or Golden Mean. Believe it or not we are still using this in design today, take a look at the iPod or iPhone both were designed with the Golden Section theory. Sweet!

To watch a video on this, visit this website HERE (WARNING there is a nude, The Vitruvian Man, famous drawing, created by Leonardo da Vinci circa 1490.) This short You tube is fascinating and gives us perspective and insight  into our created world. HERE is a website with Golden Section applied to the human face. SO cool! HERE is a tutorial on the female face to draw step-by-step. If you click on the image it will get bigger so you can print or look at it. Have fun this week!

NEW UPDATE: You can get the practice worksheets for class HERE and HERE (3 pages total) if you wish to practice(which I hope you do in preparation for this week!)

Monday, October 21, 2013

Feathers and Shells a Study of Symmetry and Balance


These two simple object hold such wonderful aspects of balance and symmetry. We are continuing our study and skill building in drawing. This week we will look at the beauty created in balance and symmetry.

Please review the terms: 
  • symmetry/balance
  • cross hatching
  • and here is a new term you will need to know. Negative drawing. The picture below is from the Art Instruction Blog  which has lots of other awesome art information but you can go here to learn more about negative drawing.

Negative drawing is a great technique to use if you are getting distracted by too much detail. It allows you to get shapes drawn by concentrating on the space surrounding the object rather than the object, itself. This allows you to draw what you see, not what you think you see. It is a way to trick your brain and let go of preconceived images. A bonus card for those who bring in a negative drawing, for next class time.


Monday, October 14, 2013

Circles, Ovals , Ellipses... OH MY!

Hi Art Students! As we continue our adventure in drawing,  we now have the components to start creating form. Light and line are both needed, in order to create form. Drawing circles, ovals and ellipses are an important skill to have and can be one of the harder shapes to master, especially in
3-D form. Remember practice makes perfect.

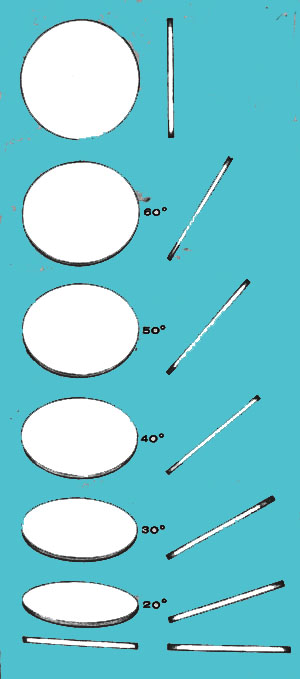
Try this! Take a quarter hold it  so that you see the face of Washington. Now start to slowly tip the top of the coin away from you  a little and stop. Look at the shape of the surface of the coin, has it changed? Now, tip it away some more. Try and make it the shape of the coin in each of the pictures at the left Eventually, the coin will be flat like at the bottom of the picture.

 To translate this concept to your drawing, think about how the angle at which you look at something circular can change, especially the opening of that object. How cool is that? I hope that you will practice some circles, ovals and ellipses this week!


Watch this quick video on how to draw circles and ellipses 


Now if you are excited about your new skills here is another video a bit longer on how to draw a pumpkin just in time for harvest season too!
Bring in your pumpkin picture this week to earn a bonus card- SWEET!!