Monday, October 21, 2013

Feathers and Shells a Study of Symmetry and Balance


These two simple object hold such wonderful aspects of balance and symmetry. We are continuing our study and skill building in drawing. This week we will look at the beauty created in balance and symmetry.

Please review the terms: 
  • symmetry/balance
  • cross hatching
  • and here is a new term you will need to know. Negative drawing. The picture below is from the Art Instruction Blog  which has lots of other awesome art information but you can go here to learn more about negative drawing.

Negative drawing is a great technique to use if you are getting distracted by too much detail. It allows you to get shapes drawn by concentrating on the space surrounding the object rather than the object, itself. This allows you to draw what you see, not what you think you see. It is a way to trick your brain and let go of preconceived images. A bonus card for those who bring in a negative drawing, for next class time.


Wednesday, October 16, 2013

The Sun, Stars and Moon

Isn't this beautiful so many colors!
We will be using photos of the universe to create beautiful pictures of the stars. Go to the following link and print off your favorite picture from the Hubble telescope to use as a model in class. HERE  Bring your picture to class we will be using it next time we meet!
 Here is a fun clip about the Hubble telescope.  I learned a lot watching this short video!  This will be a fun project.


We will be using speckled paper, stencils and oil pastels hhhhmmmm.... I wonder how we will created the sun, stars and moon with these tools? Come to class and find out!


Monday, October 14, 2013

Circles, Ovals , Ellipses... OH MY!

Hi Art Students! As we continue our adventure in drawing,  we now have the components to start creating form. Light and line are both needed, in order to create form. Drawing circles, ovals and ellipses are an important skill to have and can be one of the harder shapes to master, especially in
3-D form. Remember practice makes perfect.

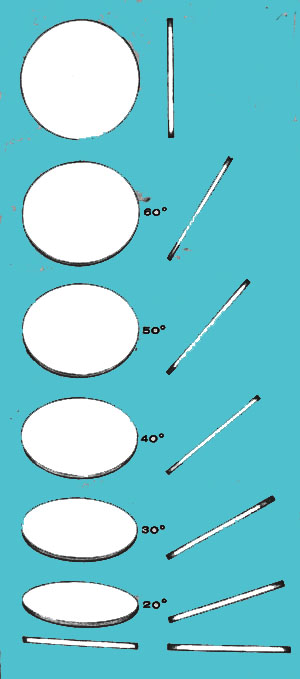
Try this! Take a quarter hold it  so that you see the face of Washington. Now start to slowly tip the top of the coin away from you  a little and stop. Look at the shape of the surface of the coin, has it changed? Now, tip it away some more. Try and make it the shape of the coin in each of the pictures at the left Eventually, the coin will be flat like at the bottom of the picture.

 To translate this concept to your drawing, think about how the angle at which you look at something circular can change, especially the opening of that object. How cool is that? I hope that you will practice some circles, ovals and ellipses this week!


Watch this quick video on how to draw circles and ellipses 


Now if you are excited about your new skills here is another video a bit longer on how to draw a pumpkin just in time for harvest season too!
Bring in your pumpkin picture this week to earn a bonus card- SWEET!!

Monday, October 7, 2013

Drawing and Shading-Shading and Drawing

 Have you practiced the sketching hold while you draw this week? Does it feel funny? Like learning anything new the more you practice the better you get and the more your body remembers.As you draw or sketch things this week, remember: you are training your hand to draw what your eyes are looking at. To help you out this week here are two, short videos on drawing shapes and shading, two important components to drawing.Come to class prepared to practice these techniques in class. Please make sure you have your pencils sharpened and your drawing tool set in your art box (the items that came with your pencils)
.
Video #1  If you practice at home bring in your work. I would love to see it!

Video#2  Is all about drawing shapes in 3-D

Monday, September 30, 2013

Are You Practicing? Here is a fun way to do it

Hi Art Students! Are you using the 6 components of drawing that we went over in class this week?  What are those again? (hint:SCALE  F)Think about that this week as you practice. In particular Lines and how they are used.

Bonus card for those who come to class having drawn a picture by following these instructions. Work each step in order:

  1. Get out a piece of blank white paper and pencil
  2. Start at one edge of the paper and make a straight line to another edge of the paper
  3. Do this again starting at a different edge of the paper and but use a line that isn't straight
  4. Now add 2 shapes of your choosing but not a circle
  5. Now add any size circle but it has to have a line through it
  6. Then, add another circle that isn't touching anything else
  7. Add 3 small shapes all the same
  8. Then add to a circle 2 thick lines that come out of it but don't touch anything else
  9. Lastly, add a triangle on top of another shape
  10. Now erase something
  11. Now choose 3 colors(markers, crayons, color pencils-you choose) and color in some but not all the spaces, choose carefully and thoughtfully.
  12. Sign and give it a title
If you are really brave do one in the sketching hold and one in the writing/drawing hold. Did it feel different? Which picture do you like better? Trust me none of us will do this in the same way and it will be fun to see what others have done don't you think? I will bring mine to class to share too.

Monday, September 9, 2013

Let's Start With The Basics

I always start the school year with a basic introduction and/or review, for some of my students, on the Elements of Art and Principles of Design. Understanding and reviewing these concepts will help give a framework to what you create, how you view artwork, and ultimately how you enjoy and interpret artwork in general.

Logic students, print off this list as an additional glossary here to use for vocabulary words. All students can  visit  this website for a fun way to review and learn about these concepts.  A feature that I appreciate, is the "Find" function at the top. This feature "find" a piece of artwork that utilizes a particular element or design principle. Please explore and use this feature. Also I will award a bonus point for those students who create a picture using the "Create" function and print it out and bring to class by week 3. I will ask you to tell me which elements and principles you used.

Visit this website here  if you like using flash cards and learning games.We use this website in our household all the time. If you would like to print off  2 pages with visual references and put it in your notebook go here. This also gives you definitions for some of your vocabulary words. Go to abbreviated versions, one for elements and one for principles. This is another way to earn a bonus point-bring to class by week 3.

Tuesday, September 3, 2013

Would you like to see what I have been working on...?

Waterlily 
9 x 12 Watercolor 2013

Hi Art Students! Each summer I take some sort of art class and spend some much needed time, honing my own artistic skills. This summer I had the privilege of  having a private art lesson from a local artist and one of my dearest friends, Laura. She had taken a watercolor class from Jeannie Vodden in California and thought I might enjoy this watercolor technique. Boy did I ever! I have painted one painting(above)with this technique and I am working on my second. I am painting from photographs that I like. In Quite a Pear I have changed the colors of the pears to be pleasing in the area where it will be hung. The really amazing thing is this technique utilizes three colors (a rose, yellow, and Phthalo blue) for most of the painting! Hard to believe but it is true.

 Quite a Pear
18 x 22 Watercolor 

So students think about this, I am mixing colors by layering thin coats of pigments, but I am also changing the values of these layers to get the different colors. Pretty awesome! The picture you see above is still in process, maybe two-thirds of  the way done. However, you can see how I have laid down thin layers of rose and blue and yellow on the right and on the left it has a couple layers of yellow, can you see the difference?

I hope you spent some time this summer working and practicing and honing your own art skills and are ready for a great school year!

Students if you are looking for some tips to prepare for class click here